Linux Foundation
File and Directory
In Linux, everything is treated as a file, including directories, devices, and even processes. A file is a collection of data that is stored on a disk or other storage device. A directory is a special type of file that contains information about other files and directories.
Directory Structure
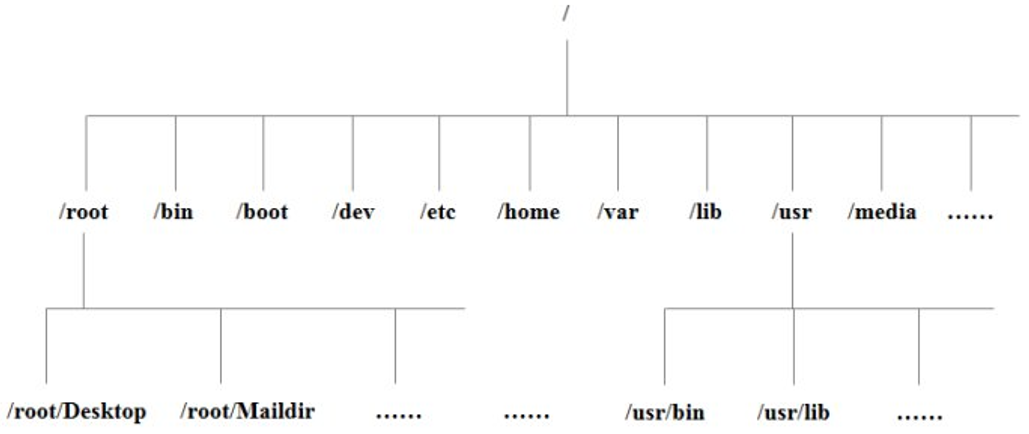
The Linux directory structure is hierarchical, with the root directory (/) at the top. Below the root directory, there are several standard directories, including:
- /bin: Contains essential command-line utilities and programs.
- /sbin: Contains system administration utilities and programs.
- /root: Contains the home directory for the root user.
- /usr: Contains user programs and data.
- /etc: Contains system configuration files.
- /boot: Contains files needed to boot the system, including the kernel and initial RAM disk.
- /run: Contains runtime data for processes and services.
- /proc: Contains virtual files that provide information about the system and running processes.
- /srv: Contains data for services provided by the system, such as web servers and databases.
- /home: Contains user home directories.
- /lib: Contains shared libraries and kernel modules.
- /sys: Contains virtual files that provide information about the system and hardware.
- /tmp: Contains temporary files.
- /dev: Contains device files that represent hardware devices.
- /mnt: Contains mount points for removable media and other file systems.
- /opt: Contains optional software packages and applications.
- /var: Contains variable data, such as log files and databases.
APT
APT (Advanced Package Tool) is a package management system used by Debian-based Linux distributions, such as Ubuntu. It allows users to easily install, update, and remove software packages from the command line. APT uses a repository system to manage software packages, which are stored in remote servers. When you run an APT command, it retrieves the package information from the repository and installs the requested package along with its dependencies. APT also provides features such as package caching, automatic updates, and package verification. Some common APT commands include:
sudo apt update: Updates the package list from the repositories.sudo apt upgrade: Upgrades all installed packages to their latest versions.sudo apt install <package_name>: Installs a specific package.sudo apt remove <package_name>: Removes a specific package.sudo apt autoremove: Removes unnecessary packages that were installed as dependencies but are no longer needed.sudo apt search <package_name>: Searches for a package in the repositories.sudo apt show <package_name>: Displays detailed information about a package.sudo apt list --installed: Lists all installed packages on the system.sudo apt list --upgradable: Lists all packages that have available updates.
1 | # Example: Installing a package |
Basic Commands
Help Command
Manual Packages is a collection of documentation for various commands and programs in Linux. It provides detailed information about how to use a command, its options, and examples of its usage. The manual pages are organized into sections, with each section covering a specific category of commands or programs. To access the manual pages, you can use the man command followed by the name of the command you want to learn about. For example, to view the manual page for the ls command, you would run:
1 | man ls |
help command is a built-in command in Linux that provides information about other commands and their usage. It is often used to quickly access information about a command without having to read through the manual pages. To use the help command, you can simply type the name of the command followed by --help. For example, to get help for the ls command, you would run:
1 | help ls |
File and Directory Commands
pwd: Prints the current working directory.ls: Lists the contents of a directory.ls -l: Lists the contents of a directory in long format, showing file permissions, ownership, size, and modification date.ls -a: Lists all files, including hidden files (those starting with a dot).ls -h: Displays file sizes in a human-readable format (e.g KB, MB, GB).ls -R: Recursively lists the contents of all subdirectories.
cd: Changes the current directory.cd ..: Moves up one directory level.cd ~: Changes to the home directory.cd -: Changes to the previous directory.cd -P: Changes to the physical directory, resolving symbolic links.
mkdir: Creates a new directory.mkdir -p: Creates a directory and any necessary parent directories.
rmdir: Removes an empty directory.touch: Creates an empty file or updates the timestamp of an existing file.cp: Copies files or directories.cp -r: Copies directories recursively.cp -i: Prompts before overwriting existing files.cp -u: Copies only when the source file is newer than the destination file or when the destination file is missing.
rm: Removes files or directories.rm -r: Removes directories and their contents recursively.rm -f: Forces removal of files without prompting for confirmation.rm -i: Prompts before removing each file.rm -v: Displays the names of files as they are removed.
mv: Moves or renames files or directories.mv -i: Prompts before overwriting existing files.mv -u: Moves only when the source file is newer than the destination file or when the destination file is missing.mv -v: Displays the names of files as they are moved or renamed.
cat: Concatenates and displays the contents of files.cat -n: Numbers all output lines.cat -b: Numbers non-empty output lines.cat -s: Squeezes multiple adjacent empty lines into a single empty line.
tail: Displays the last part of a file.tail -n <number>: Displays the last<number>lines of a file.tail -f: Continuously displays new lines added to a file in real-time.
echo: Displays a line of text or a variable value.echo -n: Suppresses the trailing newline character.echo -e: Enables interpretation of backslash escapes (e.g.,\nfor a new line,\tfor a tab,\\for a literal backslash).
>: Redirects the output of a command to a file, overwriting the file if it already exists. (eg:echo "Hello, World!" > hello.txt)>>: Redirects the output of a command to a file, appending to the file if it already exists. (eg:echo "Hello, World!" >> hello.txt)ln: Creates hard or symbolic links to files or directories.ln -s: Creates a symbolic link (symlink) to a file or directory.ln -f: Forces the creation of a link, overwriting any existing file or link with the same name.unlink: Removes a link to a file or directory.rm -f: Removes a file or link without prompting for confirmation.
history: Displays the command history.history -c: Clears the command history.history -w: Writes the current command history to a file.history -r: Reads the command history from a file.
VI/VIM Editor Commands
i: Switches to insert mode, allowing you to edit the text.Esc: Switches back to normal mode from insert mode.:w: Saves the current file.:q: Quits the editor.:wq: Saves the current file and quits the editor.:q!: Quits the editor without saving changes.dd: Deletes the current line.yy: Copies the current line.p: Pastes the copied or deleted line below the current line.u: Undoes the last action.Ctrl + r: Redoes the last undone action.gg: Moves the cursor to the beginning of the file.G: Moves the cursor to the end of the file.:set number: Displays line numbers in the editor.
User and Group Management Commands
Root User
The root user, also known as the superuser, is a special user account in Linux that has full administrative privileges. The root user can perform any action on the system, including modifying system files, installing software, and managing user accounts. It is important to use the root account with caution, as it has the potential to cause significant damage to the system if used improperly. To access the root account, you can use the sudo command followed by the desired command. For example, to edit a system file as the root user, you would run:1
sudo nano /etc/hosts
Lock and Unlock Root Account
sudo passwd -l root: Locks the root account, preventing it from being used to log in.sudo passwd -u root: Unlocks the root account, allowing it to be used to log in again.
User
A user account in Linux is a unique identifier that allows individuals to access and use the system. Each user account has its own username, password, and home directory. User accounts can be created for different purposes, such as regular users, administrators, or service accounts. To manage user accounts, you can use the useradd, usermod, and userdel commands. For example, to create a new user account named “john”, you would run:1
2sudo useradd -m john
sudo passwd john
Add user to a group
sudo usermod -aG <group_name> <username>: Adds a user to a specified group, allowing the user to inherit the permissions of that group.useradd -g <group_name> <username>: Creates a new user and assigns them to a specified group.groups <username>: Displays the groups that a user belongs to.
Lock and Unlock User Accounts
sudo usermod -L <username>: Locks a user account, preventing the user from logging in.sudo usermod -U <username>: Unlocks a user account, allowing the user to log in again.
set user password
sudo passwd <username>: Sets or changes the password for a user account.
check user exists
id <username>: Checks if a user exists and displays their user ID (UID) and group ID (GID).
view all users
cat /etc/passwd: Displays a list of all user accounts on the system, along with their details such as username, UID, GID, home directory, and default shell.
delete user
sudo userdel <username>: Deletes a user account from the system. To remove the user’s home directory and files, you can use the-roption:sudo userdel -r <username>.
update user
sudo usermod -l <new_username> <old_username>: Changes the username of an existing user account.sudo usermod -d <new_home_directory> <username>: Changes the home directory of an existing user account.
Group
A group in Linux is a collection of user accounts that share common permissions and access rights. Groups are used to manage permissions for multiple users at once, making it easier to control access to files, directories, and other resources on the system. Each group has a unique name and a group ID (GID). To manage groups, you can use the groupadd, groupmod, and groupdel commands. For example, to create a new group named “developers”, you would run:1
sudo groupadd developers
delete group
sudo groupdel <group_name>: Deletes a group from the system.
modify group
sudo groupmod -n <new_group_name> <old_group_name>: Changes the name of an existing group.sudo groupmod -g <new_gid> <group_name>: Changes the GID of an existing group.
change user’s primary group
sudo usermod -g <group_name> <username>: Changes the primary group of a user account to the specified group.
view all groups
cat /etc/group: Displays a list of all groups on the system, along with their details such as group name, GID, and the users that belong to each group.
File Permissions and Ownership Commands
File permissions in Linux determine who can read, write, or execute a file or directory. Each file and directory has three types of permissions: read (r), write (w), and execute (x). These permissions can be assigned to three categories of users: the owner of the file, the group that the file belongs to, and all other users. The chmod, chown, and chgrp commands are used to manage file permissions and ownership. For example, to change the permissions of a file named “example.txt” to allow the owner to read and write, the group to read, and others to have no permissions, you would run:1
chmod 640 example.txt
change file ownership
sudo chown <username> <file_name>: Changes the ownership of a file to a specified user.sudo chown <username>:<group_name> <file_name>: Changes the ownership of a file to a specified user and group.
change file permissions
sudo chmod <permissions> <file_name>: Changes the permissions of a file using symbolic or numeric notation. For example,sudo chmod 755 <file_name>sets read, write, and execute permissions for the owner, and read and execute permissions for the group and others.sudo chmod u+x <file_name>: Adds execute permission for the owner of the file.sudo chmod g-w <file_name>: Removes write permission for the group.sudo chmod o=r <file_name>: Sets read-only permissions for others.
change group ownership
sudo chgrp <group_name> <file_name>: Changes the group ownership of a file to a specified group.
Search and Disk Usage Commands
find: Searches for files and directories based on specified criteria.find <directory> -name <pattern>: Searches for files and directories in a specified directory that match a given pattern.find <directory> -type <file_type>: Searches for files of a specific type (e.g.,ffor regular files,dfor directories).find <directory> -size <size>: Searches for files of a specific size.
grep: Searches for patterns within files and displays matching lines.grep <pattern> <file_name>: Searches for a specific pattern in a file and displays the matching lines.grep -r <pattern> <directory>: Recursively searches for a pattern in all files within a specified directory.grep -i <pattern> <file_name>: Performs a case-insensitive search for a pattern in a file.
Zip and Unzip Commands
zip: Compresses files and directories into a ZIP archive.zip <archive_name>.zip <file1> <file2> ...: Creates a ZIP archive containing the specified files.zip -r <archive_name>.zip <directory>: Creates a ZIP archive containing the specified directory and its contents.
unzip: Extracts files from a ZIP archive.unzip <archive_name>.zip: Extracts the contents of a ZIP archive into the current directory.unzip <archive_name>.zip -d <destination_directory>: Extracts the contents of a ZIP archive into a specified destination directory.
tar: Archives and compresses files and directories using the tar format.tar -cvf <archive_name>.tar <file1> <file2> ...: Creates a tar archive containing the specified files.tar -xvf <archive_name>.tar: Extracts the contents of a tar archive into the current directory.tar -czvf <archive_name>.tar.gz <directory>: Creates a gzip-compressed tar archive containing the specified directory and its contents.tar -xzvf <archive_name>.tar.gz: Extracts the contents of a gzip-compressed tar archive into the current directory.
Networking Commands
ping: Tests the connectivity to a specified host by sending ICMP echo requests.ping <hostname_or_ip>: Sends ICMP echo requests to the specified hostname or IP address and displays the response time.ping -c <count> <hostname_or_ip>: Sends a specified number of ICMP echo requests to the target host and then stops.
ifconfig: Displays and configures network interfaces.ifconfig: Displays the current network interfaces and their configurations.ifconfig <interface> <ip_address>: Assigns a specific IP address to a network interface.ifconfig <interface> up: Activates a network interface.ifconfig <interface> down: Deactivates a network interface.
netstat: Displays network connections, routing tables, and interface statistics.netstat -tuln: Displays all listening TCP and UDP ports along with their associated processes.netstat -r: Displays the kernel routing table.netstat -i: Displays network interface statistics.netstat -anp: Displays all active network connections along with the process ID (PID) and program name of the associated processes.netstat -nlp: Displays all listening ports along with the process ID (PID) and program name of the associated processes.
hostname: Displays or sets the system’s hostname.hostname: Displays the current hostname of the system.hostname <new_hostname>: Sets a new hostname for the system.
Scheduling Commands
cron: A time-based job scheduler that allows users to schedule tasks to run at specific times or intervals.crontab -e: Edits the current user’s crontab file to schedule tasks.crontab -l: Lists the current user’s scheduled tasks.crontab -r: Removes the current user’s crontab file, effectively deleting all scheduled tasks for that user.crontab -u <username> -e: Edits the crontab file for a specific user to schedule tasks.crontab -u <username> -l: Lists the scheduled tasks for a specific user.crontab -u <username> -r: Removes the crontab file for a specific user, effectively deleting all scheduled tasks for that user.
Process Management Commands
ps: Displays information about running processes.ps aux: Displays detailed information about all running processes.ps -ef: Displays a full-format listing of all running processes.
top: Provides a real-time view of system processes and resource usage.top: Displays a dynamic, real-time view of running processes and their resource usage.top -u <username>: Displays processes owned by a specific user.
kill: Sends a signal to a process to terminate it.kill <pid>: Sends the default SIGTERM signal to terminate a process with the specified process ID (PID).kill -9 <pid>: Sends the SIGKILL signal to forcefully terminate a process with the specified PID.
pkill: Sends a signal to processes based on their name or other attributes.pkill <process_name>: Sends the default SIGTERM signal to terminate processes with the specified name.pkill -9 <process_name>: Sends the SIGKILL signal to forcefully terminate processes with the specified name.
killall: Sends a signal to all processes with a specific name.killall <process_name>: Sends the default SIGTERM signal to terminate all processes with the specified name.killall -9 <process_name>: Sends the SIGKILL signal to forcefully terminate all processes with the specified name.
free: Displays information about system memory usage.free -h: Displays memory usage in a human-readable format (e.g., KB, MB, GB).free -m: Displays memory usage in megabytes.free -g: Displays memory usage in gigabytes.
Other Useful Commands
locate: Quickly finds files and directories by name using a pre-built database.locate <file_name>: Searches for files and directories that match the specified name.locate -i <file_name>: Performs a case-insensitive search for files and directories that match the specified name.locate -r <regex_pattern>: Searches for files and directories that match a specified regular expression pattern.
du: Displays the disk usage of files and directories.du -h: Displays disk usage in a human-readable format (e.g., KB, MB, GB).du -s: Displays the total disk usage of a directory without showing the usage of individual files.
df: Displays the available disk space on the file system.df -h: Displays disk space usage in a human-readable format (e.g., KB, MB, GB).